2014-05-29

Compiling and installing Grub2 for standalone USB boot

The goal here, is to produce the necessary set of files, to be written to an USB Flash Drive using dd (rather than using the Grub installer), so that it will boot through Grub 2.x and be able to process an existing grub.cfg that sits there.

As usual, we start from nothing. I'll also assume that you know nothing about the intricacies of Grub 2 with regards to the creation of a bootable USB, so let me start with a couple of primers:

  1. For a BIOS/USB boot, Grub 2 basically works on the principle of a standard MBR (boot.img), that calls a custom second stage (core.img), which usually sits right after the MBR (sector 1, or 0x200 on the UFD) and which is a flat compressed image containing the Grub 2 kernel plus a user hand-picked set of modules (.mod).
    These modules, which get added to the base kernel, should usually limit themselves to the ones required to access the set of file systems you want Grub to be able to read a config file from and load more individual modules (some of which need to be loaded to parse the config, such as normal.mod or terminal.mod).
    As you may expect, the modules you embed with the Grub kernel and the modules you load from the target filesystem are exactly the same, so you have some choice on whether to add them to the core image or load them from the filesystem.
     
  2. You most certainly do NOT want to use the automated Grub installer in order to boot an UFD. This is because the Grub installer is designed to try to boot the OS it is running from, rather than try to boot a random target in generic fashion. Thus, if you try to follow the myriad of quick Grub 2 guides you'll find floating around, you'll end up nowhere in terms of booting a FAT or NTFS USB Flash Drive, that should be isolated of everything else.
With the above in mind, it's time to get our hands dirty. Today, I'm going to use Linux, because my attempts to try to build the latest Grub 2 using either MinGW32 or cygwin failed miserably (crypto compilation issue for MinGW, Python issue for cygwin on top of the usual CRLF annoyances for shell scripts due to the lack of a .gitattributes). I sure wish I had the time to produce a set of fixes for Grub guys, but right now, that ain't gonna happen ⇒ Linux is is.

First step is to pick up the latest source, and, since we like living on the edge, we'll be using git rather than a release tarball:

git clone git://git.savannah.gnu.org/grub.git

Then, we bootstrap and attempt to configure for the smallest image size possible, by disabling NLS (which I had hoped would remove anything gettext but turns out not to be the case - see below).

cd grub
./autogen.sh
./configure --disable-nls
make -j2

After a few minutes, your compilation should succeed, and you should find that in the grub-core/ directory, you have a boot.img, kernel.img as well as a bunch of modules (.mod).

As explained above, boot.img is really our MBR, so that's good, but we're still missing the bunch of sectors we need to write right after that, that are meant to come from a core.img file.

The reason we don't have a core.img yet is because it is generated dynamically, and we need to tell Grub exactly what modules we want in there, as well as the disk location we want the kernel to look for additional modules and config files. To do just that, we need to use the Grub utility grub-mkimage.

Now that last part (telling grub that it should look at the USB generically and in isolation, and not give a damn about our current OS or disk setup) is what nobody on the Internet seems to have the foggiest clue about, so here goes: We'll want to tell Grub to use BIOS/MBR mode (not UEFI/GPT) and that we'll have one MBR partition on our UFD containing the boot data that's not included in boot.img/core.img and that it may need to proceed. And with BIOS setting our bootable UFD as the first disk (whatever gets booted is usually the first disk BIOS will list), we should tell Grub that our disk target is hd0. Furthermore, the first MBR partition on this drive will be identified as msdos1 (Grub calls MBR-like partitions msdos#, and GPT partitions gpt#, with the index starting at 1, rather than 0 as is the case for disks).

Thus, if we want to tell Grub that it needs to look for the first MBR partition on our bootable UFD device, we must specify (hd0,msdos1) as the root for our target.
With this being sorted, the only hard part remaining is figure out the basic modules we need, so that Grub has the ability to actually identify and read stuff on a partition that may be FAT, NTFS or exFAT. To cut a long story short, you'll need at least biosdisk and part_msdos, and then a module for each type of filesystem you want to be able to access. Hence the complete command:

cd grub-core/
../grub-mkimage -v -O i386-pc -d. -p\(hd0,msdos1\)/boot/grub biosdisk part_msdos fat ntfs exfat -o core.img

NB: If you want to know what the other options are for, just run ../grub-mkimage --help
Obviously, you could go crazy adding more file systems, but the one thing you want to pay attention is the size of core.img. That's because if you want to keep it safe and stay compatible with the largest choice of disk partitioning tools, you sure want to have core.img below 32KB - 512 bytes. The reason is there still exists a bunch of partitioning utilities out there that default to creating their first partition on the second "track" of the disk. And for most modern disks, including flash drives, a track will be exactly 64 sectors. What this all means is, if you don't want to harbour the possibility of overflowing core.img onto your partition data, you really don't want it to be larger than 32256 or 0x7E00 bytes.
OK, so now that we have core.img, it's probably a good idea to create a single partition on our UFD (May I suggest using Rufus to do just that? ;)) and format it to either FAT/FAT32, NTFS or exFAT.

Once this is done, we can flat-copy both the MBR, a.k.a. boot.img, and core.img onto those first sectors. The one thing you want to pay attention to here is, while copying core.img is no sweat, because we can just use a regular 512 byte sector size, for the MBR, you need to make sure that only the first 440 bytes of boot.img are copied, so as not to overwrite the partition data and the disk signature that also resides in the MBR and that has already been filled. So please pay close attention to the bs values below:

dd if=boot.img of=/dev/sdb bs=440 count=1
dd if=core.img of=/dev/sdb bs=512 seek=1 # seek=1 skips the first block (MBR)

Side note: Of course, instead of using plain old dd, one could have used Grub's custom grub-bios-setup like this:

../grub-bios-setup -d. -b ./boot.img -c ./core.img /dev/sdb

However, the whole point of this little post is to figure out a way to add Grub 2 support to Rufus, in which we'll have to do the copying of the img files without being able to rely on external tools. Thus I'd rather demonstrate that a dd copy works just as good as the Grub tool for this.
After having run the above, you may think that all that's left is copying a grub.cfg to /boot/grub/ onto your USB device, and watch the magic happen... but you'll be wrong.

Before you can even think about loading a grub.cfg, and at the very least, Grub MUST have loaded the following modules (which you'll find in your grub-core/ directory and that need to be copied on the target into a /boot/grub/i386-pc/ folder):
  • boot.mod
  • bufio.mod
  • crypto.mod
  • extcmd.mod
  • gettext.mod
  • normal.mod
  • terminal.mod
As to why the heck we still need gettext.mod, when we made sure we disabled NLS, and also why we must have crypto, when most usages of Grub don't care about it, your guess is as good as mine...

Finally, to confirm that everything works, you can add echo.mod to the list above, and create a /boot/grub/grub.cfg on your target with the following:

insmod echo
set timeout=5

menuentry "test" {
    echo "hello"
}

Try it, and you should find that your Grub 2 config is executing at long last, whether your target filesystem in FAT, NTFS or exFAT, and you can now build custom bootable Grub 2 USBs on top of that. Isn't that nice?

FINAL NOTE: In case you're using this to try boot an existing Grub 2 based ISO from USB (say Aros), be mindful that, since we are using the very latest Grub code, there is a chance that the modules from the ISO and the kernel we use in core may have some incompatibility. Especially, you may run into the obnoxious:

error: symbol 'grub_isprint' not found.

What this basically means is that there is a mismatch between your Grub 2 kernel version and Grub 2 module. To fix that you will need to use kernel and modules from the same source.

2014-01-14

Using PHP-Gettext to localize your web pages

This is what I am now using for the Rufus Homepage. As usual, it took way too long to find all the pieces needed to solve this specific problem, so I'm going to write a guide that has them all in a single place.

What we want:

  1. A web page that detects the language from the browser, and, if a translation exists, displays that translation. If not, it falls back to the English version.
  2. A menu somewhere, that lets users pick from a list of supported languages, independently of the one set by their browser.
  3. An easy to use process for translators, that relies on the well known tools of the trade (i.e. gettext and Poedit).
  4. All of the above in a single web page, so that can we keep all the common parts together, and don't have to duplicate changes.


Where we start:

  • A web server that we control fully, and that natively supports UTF-8. I'll only say this once: In 2014, if you still don't use UTF-8 everywhere you can, then you don't deserve to host a web page, let alone administer a web server.
  • An single index.html page, in English/UTF-8, that contains pure HTML (possibly with a little sprinkling of JavaScript, but not much else).
Aaaand, that's about it really.


Prerequisites:

Because we have complete control of the server, we're going to use PHP Gettext.
Why? Because it relies on gettext, which is a mature translation framework, with solid support (including a nice GUI translation application for Windows & Mac called Poedit) and also because the performance hit of using PHP Gettext seems to be minimal compared to the alternatives. Finally, using PHP gives us the ability to simply edit our existing HTML and insert PHP code wherever we need a translation, which should make the whole process a breeze.

Thus, the first two items you need to install on your server then, if you don't have them already, will be PHP (preferably v5 or later) as well as php-gettext, plus all dependencies those two packages may have.

Then, you will need to install is php5-intl, so that we can use the locale_accept_from_http() function call to detect the browser locale from our visitors.

Finally, you must ensure that your server serves ALL the locales you are planning to support, in UTF-8. Especially, issuing locale -a | grep utf8 on your server must return AN AWFUL LOT of entries (on mine, I get more than 150 of them, and that is the way it should be).
If issuing locale -a | grep utf8 | wc -l returns less than 100 entries, then, unless you are planning to restrict your site to only a small part of the world, you will need to first sort that out, for instance by installing the locales-all package. This is because gettext will not support a locale that is unknown to the system. For instance, if you don't see fr_CA.utf8 listed in your locale -a, then no matter what you do, even if you have other French locales listed, gettext will not know how to handle browsers that are set to Canadian French. You have been warned!


Testing PHP gettext support:

At this stage, I will assume that you have php5, php5-intl, php-gettext and possibly other dependencies such as libapache2-mod-php5, gettext and co. installed. If you are using Apache2, you may also have to enable the PHP5 module, by symlinking php5.conf and php5.load in your /etc/apache2/mods-enabled/, and possibly edit php5.conf to allow running PHP scripts in user directories (which is disabled by default).

The first thing we'll do, to check that everything is in order before starting with localization, is simply create an info.php, at the same location where you have your index.html, and that contains the following one liner:
<? phpinfo(); ?>

Now, you should navigate to <your_website>/info.php and confirm that:
  1. You get a whole bunch of PHP information from your server
  2. In this whole set of data, you see a line stating "GetText Support: enabled"
If you don't see any of the above, then you will need to sort your PHP settings before proceeding, as everything that follows relies on having at least the above working. For one, we want to confirm that both PHP and the short script form (<? rather than <?php), which is what we'll use in the code below, are working, and also, get some assurance that gettext is enabled. So make sure to edit your php.ini or conf settings, if you need to sort things out.

Once you got the above simple test going, you should delete that info.php file, as you don't want attackers to know too much about the PHP and server settings you're running under.


Let's get crackin'


With PHP now confirmed working, let's set our translation rolling with PHP-Gettext. For that I'm going to loosely follow this guide. I say loosely, because I found that it was woefully incomplete and left out the most crucial parts.
  1. Start by duplicate your existing index.html as index2.php. This will enable us to work on adding translations to index2.php without interfering with the existing site, until we're happy enough that we can replace index.html altogether. Of course we picked index2.php rather than index.php, to make sure our server doesn't try to serve the file we're testing over the live index.html that's assumed to already exist in that directory.

  2. In index2.php, and provided you want to test a French translation (you don't really have to speak French if you just want to test that things work), somewhere after the initial <html> tag, add the following PHP header:

    <?
    $langs = array(
      'en_US' => array('en', 'English (International)'),
      'fr_FR' => array('fr', 'French (Français)'),
    );
    $locale = "en_US";
    if (isset($_SERVER["HTTP_ACCEPT_LANGUAGE"]))
      $locale = locale_accept_from_http($_SERVER["HTTP_ACCEPT_LANGUAGE"]);
    if (isSet($_GET["locale"])) {
      $locale = $_GET["locale"];
    }
    $locale = preg_replace("/[^a-zA-Z_]/", "", substr($locale,0,5));
    foreach($langs as $code => $lang) {
      if(substr($locale,0,strlen($lang[0])) == $lang[0]) {
        $locale = $code;
        break;
      }
    }
    // Must append ".utf8" suffix here, else languages such as Azerbaijani won't work
    setlocale(LC_MESSAGES, $locale . ".utf8");
    // Also set the LANGUAGE variable, which may be needed on some systems
    putenv("LANGUAGE=" . $locale);
    bindtextdomain("index", "./locale");
    bind_textdomain_codeset("index", "UTF-8");
    textdomain("index");
    ?>

    What this code does is:
    • Create an array of languages that we will support from the language selection menu (here English and French). You'll notice that this is actually an array of arrays, but more about this later.
    • After setting the default to English, read the preferred locale from the browser, if HTTP_ACCEPT_LANGUAGE is defined (isset(...)), using locale_accept_from_http(). If that locale is not overridden with a ?locale= parameter passed on the URL, it's the one that will be used throughout the rest of the file.
    • Find if a locale parameter was passed on the URL and set the $locale variable to it if that's the case.
    • Sanitize the locale parameter to ensure that it only contains only alphabetical or underscore, and is no more than 5 characters long (anything that can be entered by users must be considered potentially harmful and SHOULD BE SANITIZED!).
    • Ensure that if we get a short locale (eg. fr rather than fr_FR), or if we get a locale for a language we support, but for a region that we don't (eg. fr_CA), we convert it to the closest locale_REGION form we support. This is very important, as the browser may only provide us with fr or fr_CA when invoking locale_accept_from_http and want to have these locales mapped to fr_FR for subsequent processing.
    • Tell gettext that it should use UTF-8 and look for index.mo in a ./locale/<LOCALE>/LC_MESSAGES/ for translations (eg. ./locale/fr/LC_MESSAGES/index.mo).

  3. Somewhere in a div (eg. the one for a right sidebar) add the following code for the language selection menu:

    <select onchange="self.location='?locale='+this.options[this.selectedIndex].value">
    <? foreach($langs as $code => $lang): ?>
      <option &lt? if(substr($locale,0,strlen($lang[0])) == $lang[0]) echo "selected=\"selected\"";?> value="<?= $code;?>">
      <?= $lang[1]; ?>
    </option>
    <? endforeach; ?>
    </select>

    What this code does is:
    • Create a dropdown with all the languages from our $langs array.
    • Check out if the first characters of our $locale matches the short language code from our array, and set the dropdown entry as the selected one if that is the case. This ensures that "French" will be selected in our dropdown, regardless of whether the locale is fr_CA, fr_FR or any of the other fr_XX locales.
    • When a user selects an entry from the dropdown, add a ?locale=en_US or ?locale=fr_FR to the URL, to force the page to be refreshed using that language.

  4. For every place where you want to translate a string, use something like <?= _("Hello, world");?>, where <?= is the short version of <?php echo and _( is the actual call to gettext. What gettext does then is, find out if a translation exists for the string being passed as parameter and either use that if it exists, or the original untranslated string otherwise.

  5. Of course, you can use the whole gamut of PHP function calls, and say, if you want to insert a variable in your translated string, such as a date, do something like:
    <? printf(_("Last updated %s:"), $last_date);?>.
    Also, if needed, and this is something that is very useful to know, you can insert translator notes using comments (/* ... */ within your PHP, before the _(...) calls. These comments will then be displayed for all translators to see in Poedit (as long as you used the -c option when creating your PO catalog with xgettext).

  6. Save your index2.php and confirm that you get to see the English strings, the dropdown with 2 entries, as well as ?locale=fr_FR or ?locale=en_US appended to the URL when you select an entry from the dropdown. Of course, since we haven't created any translation for French, the English text still displays when French is selected, as the default of gettext is to use the original if a translation is missing, but we will address that shortly.

  7. Create a ./locale/fr/LC_MESSAGES/ set of subdirectories, at the location where you have your index2.php page.

  8. Now we need to generate the gettext catalog, or POT, which is the file you will have to provide  translators with, in order for them to start creating a translation. Now, while Poedit is supposed to be able to process a PHP file to generate a .pot, I couldn't for the life of me figure out how to do just that with the Windows version. Moreover, the .pot creation is really something you want to do on the server anyway, so, to cut a long story short, we're just going to call xgettext, using a script, to produce our .pot on the server. Here is the content of that script:

    #!/bin/sh
    xgettext --package-version=1.0 --from-code=UTF-8 --copyright-holder="Pete Batard" --package-name="Rufus Homepage" --msgid-bugs-address=pete@akeo.ie -L PHP -c -d index -o ./locale/index.pot index2.php
    sed --in-place ./locale/index.pot --expression='s/SOME DESCRIPTIVE TITLE/Rufus Homepage/'
    sed --in-place ./locale/index.pot --expression='1,6s/YEAR/2014/'
    sed --in-place ./locale/index.pot --expression='1,6s/PACKAGE/Rufus/'
    sed --in-place ./locale/index.pot --expression='1,6s/FIRST AUTHOR/Pete Batard/'
    sed --in-place ./locale/index.pot --expression='1,6s/EMAIL@ADDRESS/pete@akeo.ie/'

    Running the above, in the directory where we have our PHP, creates our index.pot under the ./locale/ subdirectory, and fills in some important variables that xgettext mysteriously doesn't seem to provide any means to set. As you can see, we used the -c option so that any notes to translators that we added using PHP comments are carried over.

  9. Now, we're doing into the part that is generally meant to be done by a translator: download the index.pot, and open it in Poedit. From there, set your target language (here fr_FR) and translate the various strings (eg. "Hello, world""Bonjour, monde"). Save your translation as index.po/index.mo (Poedit will create both files) and upload index.mo in ./locale/fr/LC_MESSAGES/.

  10. Voilà! If you did all of the above properly and select French in the dropdown or use a browser that has French as its preferred language, then you should now see the relevant sections translated. "C'est magique, non?"

  11. From there, you will of course need to add PHP for all of the page content that you want to see translated, by enclosing the English text it into <? _(...);?> sections (don't worry about the constant switching between HTML and PHP mode - PHP is designed to be very efficient at doing just that!). Once you're happy, just rename your index2.php to index.php (but make sure to remove your index.html first, or you may run into weird issues), and you are fully ready to get your content localized. To do that, just run the POT creation script again (make sure you edit the script if needed, so that is applies to index.php now), and provide index.pot to your translators. Then wait for them to send your their .mo files, edit the code above to add a new array line for each extra language, and watch in awe as visitors experience your site in that new language. Now, it wasn't that hard after all, was it?


Additional remarks:

Can't we just do away with the double fr_FR and fr in our array?

Unfortunately, no. The short explanation is, even after you place your translation under a /fr/ subdirectory, so that it is used by default when your locale is fr_FR, fr_CA, fr_BE, fr_CH and so on, gettext still can't work with a locale that is just set to fr. This is because, as explained in the Prerequisites, if your system doesn't have an fr or fr.utf8 listed with locale -a, gettext just doesn't know how to handle it language.

Now. the long explanation as to why don't we couldn't just use a single fr_FR in our $langs array is: we want to smartly set our dropdown to French, even when fr_CA is provided, and we can't do something as simple as just picking the first two characters of the array locale, due to the fact that we will also want to support both pt_PT and pt_BR as well as zh_CN and zh_TW, as separate languages (because that's pretty much what they are). So, if we were to just try to isolate the substring up to the underscore, then if we had zh_CN defined before zh_TW in our array, Traditional Chinese speakers would see the dropdown set to Simplified Chinese and that's not what we want.

Thus, for our dropdown selection comparison, we must provide a value that is the lowest common denominator we want the language to apply to, which can be either a simple fr or es, or a longer pt_BR or zh_CN. But as we explained previously, we can't use that lowest common denominator for locale selection, as gettext might not know how to handle it. And that is why we need to duplicate part of the locale in two places in our array.

<rant>Of course, it would be oh so much simpler if OSes agreed that short locales without a region are perfectly valid entities by default, especially as gettext doesn't seem to have any issue accepting them when looking for .mo files, but hey, that's localization for you: no-one EVER manages to get it right...</rant>

How about a real-life example?

Alright... Since I'm all about Open Source, let me show you exactly how I am applying all of the above to the Rufus Homepage. You can click the following to access the current index.php source for the Rufus site, as well as the locale/ subdirectory. There's also this guide, that I provide to any translator who volunteered to create a translation for the homepage. Hopefully, these will help you fill any blanks, and allow you to provide an awesome multilingual web page!

What about right-to-left languages?

Look at the PHP source and look for the use of the $dir variable.

2013-11-04

Reverse Engineering a dwIoControlCode from DeviceIoControl

If you happen to Reverse Engineer Windows stuff, sooner or later you're going to want to translate a numeric dwIoControlCode from your assembly to something more palatable. To that end, head to: http://www.ioctls.net.

2013-10-08

Compiling and running your own Android kernel on the Nexus 7 2013

Now at last we're getting to the interesting part: compiling and running our own modified kernel on the Nexus!

We are of course going to pick most of our information from the official kernel building guide, though, unlike the guide, we're going to go all the way through, and not stop before we are actually running our recompiled kernel.

This time, we'll use Linux as our development platform (more convenient). The first thing I need to warn you about then is, if you're running a pure 64 bit distro (such as Slackware x64), you're going to find that you must install a 32-bit compatibility layer to run the 32 bit debug utilities. This is a bit annoying, and I'm not going to guide you through that, so make sure you sort your platform issues, okay?

Installing the toolchain


Anyway, first order of the day is to get the official arm toolchain, which I'm going to install in /usr/local/share/ since I plan to keep using it for some time:

# cd /usr/local/share/
# git clone https://android.googlesource.com/platform/prebuilts/gcc/linux-x86/arm/arm-eabi-4.6
Cloning into 'arm-eabi-4.6'...
remote: Sending approximately 124.64 MiB ...
remote: Counting objects: 33, done
remote: Finding sources: 100% (33/33)
remote: Total 580 (delta 146), reused 580 (delta 146)
Receiving objects: 100% (580/580), 124.64 MiB | 715 KiB/s, done.
Resolving deltas: 100% (146/146), done.

Now, let's add that arm toolchain to our path:

# export PATH=$PATH:/usr/local/share/arm-eabi-4.6/bin
# arm-eabi-gcc --version
arm-eabi-gcc (GCC) 4.6.x-google 20120106 (prerelease)
Copyright (C) 2011 Free Software Foundation, Inc.
This is free software; see the source for copying conditions.  There is NO
warranty; not even for MERCHANTABILITY or FITNESS FOR A PARTICULAR PURPOSE.

Ideally, of course, you'd want to add this export into your .profile or something so that you don't have to set it up every time.

Dude, where's the kernel source?


OK, now we want to fetch the kernel source of course, so let's do just that. The one thing you need to know is that the platform name for the Nexus 7 2013 is msm, thus:
# mkdir /usr/src/android
# cd /usr/src/android/
# git clone https://android.googlesource.com/kernel/msm.git kernel
Cloning into 'kernel'...
remote: Sending approximately 850.89 MiB ...
remote: Counting objects: 50642, done
remote: Finding sources: 100% (5223/5223)
remote: Getting sizes: 100% (699/699)
remote: Compressing objects:  99% (11626/11627)
remote: Total 3195022 (delta 2625647), reused 3194640 (delta 2625583)
Receiving objects: 100% (3195022/3195022), 850.15 MiB | 716 KiB/s, done.
Resolving deltas: 100% (2634067/2634067), done.

As can be seen from the above, expect a download of about 850 MB.
# cd kernel
# ls
#

Huh, there's nothing in there?

# git show
commit f688a7654b339885e689d0f95f38b9daa3d85c0f
Author: Jean-Baptiste Queru <jbq@google.com>
Date:   Thu Nov 17 12:44:41 2011 -0800

    empty commit
lines 1-5/5 (END)
# git branch -a
* master
  remotes/origin/HEAD -> origin/master
  remotes/origin/android-msm-2.6.35
  remotes/origin/android-msm-3.9-usb-and-mmc-hacks
  remotes/origin/android-msm-flo-3.4-jb-mr2
  remotes/origin/android-msm-mako-3.4-jb-mr1
  remotes/origin/android-msm-mako-3.4-jb-mr1-fr
  remotes/origin/android-msm-mako-3.4-jb-mr1-kgsl
  remotes/origin/android-msm-mako-3.4-jb-mr1.1
  remotes/origin/android-msm-mako-3.4-jb-mr2
  remotes/origin/android-msm-sony-cm-jb-3.0
  remotes/origin/master

Mmmm, OK, maybe the flo branch then?

# git checkout android-msm-flo-3.4-jb-mr2
Checking out files: 100% (41678/41678), done.
Branch android-msm-flo-3.4-jb-mr2 set up to track remote branch android-msm-flo-3.4-jb-mr2 from origin.
Switched to a new branch 'android-msm-flo-3.4-jb-mr2'
root@stella:/usr/src/android/kernel# git show
commit 9e52a2195889f4f03ddfcaefb19c0b42ec1d9070
Author: Praveen Chavan <pchavan@codeaurora.org>
Date:   Fri Mar 29 17:28:31 2013 -0700

    qseecom: Fix issue with incomplete command exiting prematurely

    A process waiting on a signal can be awaken by any signal. We
    need to only continue processing when the condition of the
    wait event is met.

    Change-Id: Ib2102babbb505876f89b04399729e6ff5a475605
    Signed-off-by: Mona Hossain <mhossain@codeaurora.org>
    Signed-off-by: Praveen Chavan <pchavan codeaurora.org>

Let me spare you the suspense there: As "documented" on their page, Google don't actually use branches or even tags for their development. Instead they force you to use an sha1 reference that's not attached to any helpful entity, in order to figure out the branch you should pick. Moreover, what they advise you to do to get that SHA is go for another large download of pointless binary data (650 MB) containing all the revision of their kernel files. Well, not everybody's running on Google Fibre... yet, and my ISP also enforces quotas, so, since we're smarter than this, we're going to avoid downloading 650 MB in exchange of a few SHA bytes. Instead, we'll head directly to https://android.googlesource.com/device/asus/flo-kernel and look at the most recent "flo: prebuilt kernel", which, at the time of this post, is:

79816e3  flo: prebuilt kernel by Jean-Baptiste Queru - 2 months ago jb-mr2-dev master tools_r22.2 android-4.3_r2.1

If you click on the link, you'll see part of the SHA we are really after here:

365a6e0 gpu: ion: Minimize allocation fallback delay

That 365a6e0 is the ID we're seeking, so let's use that (and also reuse the official kernel name, 'android-4.3_r2.1', for our branch name):

# git checkout -b android-4.3_r2.1 365a6e0
Switched to a new branch 'android-4.3_r2.1'
# ls
AndroidKernel.mk  CREDITS         Kbuild   MAINTAINERS  README          arch/   crypto/   firmware/  include/  ipc/     lib/                mm/   samples/  security/  tools/  virt/
COPYING           Documentation/  Kconfig  Makefile     REPORTING-BUGS  block/  drivers/  fs/        init/     kernel/  make_defconfig.sh*  net/  scripts/  sound/     usr/

That's more like it!

NB: We could be even smarter by just looking at the kernel revision provided by our device (3.4.0-g365a6e0), drop the whole part before the g and recognize that this is the partial SHA1 we are after. Then again, since there's a chance a new kernel was out and you're running an old or custom one...

Compiling the Android kernel


Now we need to set the variables that will tell the OS that we're cross compiling (again, something that you may want to do in your .profile using something like alias cross='export ARCH="arm";export SUBARCH="arm";export CROSS_COMPILE="arm-eabi-"'):

# export ARCH=arm
# export SUBARCH=arm
# export CROSS_COMPILE=arm-eabi-

Finally, we can initialize our default config and get going:

# make flo_defconfig
  HOSTCC  scripts/basic/fixdep
  HOSTCC  scripts/kconfig/conf.o
  SHIPPED scripts/kconfig/zconf.tab.c
  SHIPPED scripts/kconfig/zconf.lex.c
  SHIPPED scripts/kconfig/zconf.hash.c
  HOSTCC  scripts/kconfig/zconf.tab.o
  HOSTLD  scripts/kconfig/conf
warning: (ARCH_MSM_KRAITMP && ARCH_MSM_CORTEX_A5) selects HAVE_HW_BRKPT_RESERVED_RW_ACCESS which has unmet direct dependencies (HAVE_HW_BREAKPOINT)
# make menuconfig
  HOSTCC  scripts/kconfig/lxdialog/checklist.o
  HOSTCC  scripts/kconfig/lxdialog/inputbox.o
  HOSTCC  scripts/kconfig/lxdialog/menubox.o
  HOSTCC  scripts/kconfig/lxdialog/textbox.o
  HOSTCC  scripts/kconfig/lxdialog/util.o
  HOSTCC  scripts/kconfig/lxdialog/yesno.o
  HOSTCC  scripts/kconfig/mconf.o
  HOSTLD  scripts/kconfig/mconf
scripts/kconfig/mconf Kconfig
warning: (ARCH_MSM_KRAITMP && ARCH_MSM_CORTEX_A5) selects HAVE_HW_BRKPT_RESERVED_RW_ACCESS which has unmet direct dependencies (HAVE_HW_BREAKPOINT)

Now that we're in the kernel config, let's start with something real basic, and change General setup ---> Local version - append to kernel release setting it to something like "hello". Hopefully, we'll be able to boot our recompiled kernel and see that string appear in the system info, to confirm that we are indeed using our own kernel. Off we go with building the whole thing then:

# make -j8
(...)
  OBJCOPY arch/arm/boot/zImage
  Kernel: arch/arm/boot/zImage is ready

We have a kernel — now what?


Aaaaand, that's pretty much where the Google guide stops. What do you mean, you also want to run your newly compiled kernel on your device?

If that's the case, then you should download more than 16 GB worth of build files from the infamous aosp (Android Open Source Project) suite —I wish I was kidding, see below— and then figure out how to inject your kernel in there. Good luck!

My usage data (in MB) after downloading the full aosp.
(Careful analysis may be required to notice the small difference in data usage)

The 16 GB of the full aosp (I was already 2 GB in for that day, hence the 18 GB above) sure put me dangerously close of getting a not so friendly call from my ISP for going over the monthly quota (again, not everybody is running on Google Fibre), so I might try to spare you this trouble.

If you're not going to download the aosp to try to figure out this mess, the first thing you should know then is that, as opposed to what is the case on most devices, testing your kernel on Android isn't as simple as pointing your bootloader to it. It must be included into a custom boot image (boot.img) along with a RAM disk and some other stuff.

Crafting an Android boot.img


The format of this Android boot images can be found in the bootimg.h of the mkbootimg tool from the android platform/system/core source (at least up to Android 10). I guess we have to start somewhere, and we'll need to produce our own images, so let's start by fetching and recompiling mkbootimg then.

NB: Since I duplicated and improved on the original tools (see below), you can, and probably should, use https://github.com/pbatard/bootimg-tools.git instead of https://android.googlesource.com/platform/system/core for the git clone URL below.

# git clone https://android.googlesource.com/platform/system/core bootimg-tools
Cloning into 'bootimg-tools'...
remote: Counting objects: 92, done
remote: Finding sources: 100% (92/92)
remote: Total 19302 (delta 11674), reused 19302 (delta 11674)
Receiving objects: 100% (19302/19302), 5.87 MiB | 655 KiB/s, done.
Resolving deltas: 100% (11674/11674), done.
# cd bootimg-tools/libmincrypt/
# gcc -c *.c -I../include
# ar rcs libmincrypt.a *.o
# cd ../mkbootimg
# gcc mkbootimg.c -o mkbootimg -I../include ../libmincrypt/libmincrypt.a
mkbootimg.c: In function 'main':
mkbootimg.c:245:9: warning: assignment discards 'const' qualifier from pointer target type [enabled by default]
# cp mkbootimg /usr/local/bin/
# cd ../cpio
# gcc mkbootfs.c  -o mkbootfs -I../include
# cp mkbootfs /usr/local/bin/

With the above, we'll be able to invoke mkbootimg and optionally mkbootfs to create an image. If you follow this guide closely, you'll see that we're not even actually going to use mkbootfs, but I kept it there just in case.

Now, we don't want to recreate our RAM disk from scratch, or have to guess all the parameters we'll need to use to create one, so let's pick a working one. For this you have two choices:
  • Use a backup utility on your rooted Android device, and save the partition that contains the boot image. For instance, if you installed TWRP when rooting your device, and boot into recovery, then you will be able to save the 16MB Boot partition, which is what we are after.
  • Download the latest factory image (at the time of this writing, it's JSS15R, 359MB big), extract it in full (tar then zip), and then pick the boot.img image from the zip (in JSS15R, that would be boot.img within image-razor-jss15r.zip). You also want to be mindful that bootloader-flo-flo-03.14.img is the bootloader image, and NOT what we are after.
Also, don't let the fact that in one case you get a 16MB file and in the other one that is less than 7MB worry you. The 16MB one is just padded with zeroes, which won't matter when we access its content.
For the remainder of this guide, even as it requires a 359 MB download, I'll go with using boot.img from the factory image.

Next thing we need is a way to unpack that boot.img file. There are a couple of unpack-bootimg.pl/split-bootimg.pl perl scripts dating back from 2008, so we can pick one of those and then use a binary editor take a look at the .img and extract the addresses and parameters we should provide mkbootimg, and try to cross-reference those with... Aaaaagh, I can't stand it any more!!!

That's "Aaaaagh!" with five A's


What the £$%^& is wrong with Android developers?!? Why the heck aren't these unpacker scripts providing you with the full set of parameters you need to use to repack an image, instead of having to look at a binary header, or some mysterious settings file in a 16GB repository to find them? Also, why, in 5 years, hasn't anyone, including Google, improved these tools and scripts? The thing is, even mkbootimg has issues and won't work on Windows (when compiled with MinGW) due to the use of non-Windows friendly open(), read(), write() et cetera.

That does it!

I'm gonna write my own unpack tool in C, fix mkbootimg in the process, and put it all on github.
Sheesh, as if I didn't have better things to do... I hope you're happy!

So off we go to the directory you compiled mkbootimg (NB: I you cloned from https://github.com/pbatard/bootimg-tools.git earlier, you can skip the wget line):

# cd /usr/src/android/bootimg-tools/mkbootimg/
# wget https://raw.github.com/pbatard/bootimg-tools/master/mkbootimg/unmkbootimg.c
# gcc -o unmkbootimg unmkbootimg.c
# cp unmkbootimg /usr/local/bin/

Now at last, you have the minimum of unmkbootimg, mkbootimg and mkbootfs installed in your path, and we can get going with our testing of the kernel.
I'll assume that you have a /usr/src/android/boot where you copied your boot.img, so let's get cracking:

# cd /usr/src/android/boot/
# ls
boot.img
# unmkbootimg -i boot.img
kernel written to 'kernel' (6640200 bytes)
ramdisk written to 'ramdisk.cpio.gz' (399979 bytes)

To rebuild this boot image, you can use the command:
  mkbootimg --base 0 --pagesize 2048 --kernel_offset 0x80208000 --ramdisk_offset 0x82200000 --second_offset 0x81100000 --tags_offset 0x80200100 --cmdline 'console=ttyHSL0,115200,n8 androidboot.hardware=flo user_debug=31 msm_rtb.filter=0x3F ehci-hcd.park=3' --kernel kernel --ramdisk ramdisk.cpio.gz -o boot.img
# ls
boot.img  kernel  ramdisk.cpio.gz

As an aside that you don't need to run, but since it should be elementary that this is the basic functionality you want from a proper boot image unpack tool, we can confirm that the data provided by the unpack tool will produce a boot.img that is binary identical to the original one:
# mkbootimg --base 0 --pagesize 2048 --kernel_offset 0x80208000 --ramdisk_offset 0x82200000 --second_offset 0x81100000 --tags_offset 0x80200100 --cmdline 'console=ttyHSL0,115200,n8 androidboot.hardware=flo user_debug=31 msm_rtb.filter=0x3F ehci-hcd.park=3' --kernel kernel --ramdisk ramdisk.cpio.gz -o myboot.img
# ls
boot.img  kernel  myboot.img  ramdisk.cpio.gz
# cmp -l boot.img myboot.img
#

Now, THIS is what you want to be able to do from an Android image unpacking tool. Is it really that much to ask?

Crafting an Android boot.img 2: 'Electric boogaloo'


Moving on. Since we just want to test a kernel, we shouldn't really have to touch the cpio image (ramdisk), but then again, my goal here is to give you as many pointers as I can, so we might as well see how we craft our own ramdisk while we're at it. What we're going to do here, as an academic exercise, is add an it_works file at the root of the filesystem, which we'll look for after we booted, to confirm that we are able to use our modified stuff all the way through:

# mkdir ramdisk
# cd ramdisk
# gunzip -c ../ramdisk.cpio.gz | cpio -iu
# ls
charger*       init*             proc/              sys/
data/          init.flo.rc*      property_contexts  system/
default.prop   init.flo.usb.rc*  res/               ueventd.flo.rc
dev/           init.rc*          sbin/              ueventd.rc
file_contexts  init.trace.rc*    seapp_contexts
fstab.flo      init.usb.rc*      sepolicy
# touch it_works
# ls
charger*       init*             it_works           sepolicy
data/          init.flo.rc*      proc/              sys/
default.prop   init.flo.usb.rc*  property_contexts  system/
dev/           init.rc*          res/               ueventd.flo.rc
file_contexts  init.trace.rc*    sbin/              ueventd.rc
fstab.flo      init.usb.rc*      seapp_contexts
# find . | cpio -o -H newc | gzip > ../myramdisk.cpio.gz
1410 blocks
# cd ..
# ls
boot.img  kernel  myramdisk.cpio.gz  ramdisk/  ramdisk.cpio.gz

We're finally set for the last part, where we copy the kernel we compiled earlier, and invoke mkbootimg with the set of parameters we got from unmkbootimg, and use both our modified kernel and cpio image:

# cp /usr/src/android/kernel/arch/arm/boot/zImage .
# ls
boot.img  kernel  myramdisk.cpio.gz  ramdisk/  ramdisk.cpio.gz  zImage*
# mkbootimg --base 0 --pagesize 2048 --kernel_offset 0x80208000 --ramdisk_offset 0x82200000 --second_offset 0x81100000 --tags_offset 0x80200100 --cmdline 'console=ttyHSL0,115200,n8 androidboot.hardware=flo user_debug=31 msm_rtb.filter=0x3F ehci-hcd.park=3' --kernel zImage --ramdisk myramdisk.cpio.gz -o myboot.img
# ls
boot.img  kernel  myboot.img  myramdisk.cpio.gz  ramdisk/  ramdisk.cpio.gz  zImage*

Finally, a custom boot.img we can test. Let's press on by copying this myboot.img file into the directory we have adb and fastboot installed (see our earlier post about rooting the Nexus 7) and run the following set of commands which, unlike what many other guides seem to advise (what the heck, guys?), is NOT going to flash the kernel/boot.img but simply run it from memory. This means that, in case there's any mishap, you can simply power the Nexus off and you'll be good as new:

# ./adb start-server
* daemon not running. starting it now on port 5037 *
* daemon started successfully *
# ./adb reboot bootloader
# ./fastboot boot myboot.img
downloading 'boot.img'...
OKAY [  0.223s]
booting...
OKAY [  0.023s]
finished. total time: 0.246s

The moment of truth!

After a long few seconds of anxiety, where the device doesn't seem to do anything, you should see either one of these two things:
  • The Nexus' multicoloured 'X', telling you that your boot.img file was fine and that the tablet is now booting it, or
  • The Google logo with the open lock, indicating that the device didn't accept your boot image and is restarting with the one it has in flash (or complete freezout, if which case you should press the power button until your device turns off)
If you've seen the multicoloured 'X' straight away, then there's a good chance that, if you go to your tablet settings, you'll see the following reported:


A few things you should recognize above:
  • That hello appended to the 3.4.0 kernel version, that's the "local version" string we chose to add to our kernel when we recompiled
  • root@stella as the user who compiled this kernel (yeah, I tend to compile stuff as root - so sue me!)
  • That 365a6e0 after the g (for 'git') in the version number, that's the SHA1 from the git commit we had to pick to compile our kernel.
All in all, this looks fairly good. And a quick look to the root filesystem (through adb shell or through ssh) will also confirm that our it_works file is there, so we can also add whatever we want on the initial filesystem. Neat!

From there on, you can go ahead and tweak your kernel and initial filesystem exactly as you see fit. And after you have tested that everything works as it should, you can go ahead and flash the boot partition with your shiny custom boot.img, using:

fastboot flash boot boot.img

For the record, if you actually modify the source of your kernel, you should see a -dirty qualifier appended to your kernel version, which is normal, and won't prevent you to run a modified kernel.

Now what are you doing still reading this guide: get hacking your device already!

2013-10-03

Nexus 7 (2013) - The good, the bad and the ugly

Since I have been using it for a few weeks, here's my short pictureless yet picturesque review of the Nexus 7 2013.

The good

  • The screen resolution of course. 1920x1200 is the minimum resolution I consider reasonable for a 7" tablet, period. Anything less is crappy DPI. It's 2013, we're not using pixelated DOS any more.
  • Plays any 720p mkv you throw at it without trouble, including Hi10 (at least with the excellent MX Player). Also seems to play a fair share of (non Hi10) 1080p mkv's alright, but more about this below.
  • This auto-brightness feature is great. It's probably been a feature of Android for some time, and most likely didn't originate from Android in the first place, but with the Nexus 7 being my first mobile Android device, I can only go "Of course, you'd want to use the front camera sensor to automatically adjust the screen brightness according to the environment!". 
  • Likewise, the independent new message notification light, is a another "Of course!"-type of feature.
  • Screen is actually readable while standing outside on a bright sunny day. Not that I care that much about using a tablet outside, but it's nice to know you should be able to do so if you need to.
  • Passed a few minor hurdles (unlocking and rooting), the device is very developer-friendly. At least, it's open enough to let run your own customized kernel in a reasonable amount of time, as well as configure the OS exactly as you see fit. Bite me, Apple!
  • Supports > 54 Mbps WiFi (a.k.a. 802.11n). This is likely to be useful if, unlike everybody else out there, you actually plan to keep using your Nexus in 5 years time or more. Yes, there exist consumers who don't go around and change their mobile device every other year!
  • Standard USB port for charging and data. None of this proprietary connector crap.
  • Supports wireless charging. Being able to rely on two options for charging your device could be a life saver in the long run, if the other option breaks down.
  • Can actually store and play mkv's that are larger than 8 GB. If it isn't obvious by now, I am quite interested in HD movie playout.
    I mean, it would be a shame to have a high resolution 7" screen, and not use it as an HD player wouldn't it?
  • Sleek design. This is my first tablet after all, and I do consider it as a direct "upgrade" from my last portable device, which was a PSP-1000 (bought in 2006), so I'll reserve the right to be pleased by the form factor. Oh, and I sure hope that tablet will last as long in terms of use as my old sturdy PSP.
  • Automatically recognizes USB keyboards and/or mice. Though you have to use an OTG adapter, this too could come handy.
  • Quad core CPU. Unless recompilation of a full Linux kernel on your device doesn't sound like a ridiculous prospect, your device is underpowered.
  • Decent battery life. Could probably watch a couple movies over a transatlantic flight, and have some power left. I like that idea. Of course, the real killer would be to have enough power to play a full game of Civ 5, should Civ 5 ever been ported (or portable) to Android. Oh well, a man can dream...
  • Storage can (awkwardly) be extended through the use of a cheap USB OTG adapter. Doesn't compensate for an SD card expansion, but makes the pill somewhat easier to swallow.
  • The Play Store is furnished with more than enough good free apps to find something that will appeal to you when it comes to performing common tasks.
  • From having used some of their hardware, I have at least some confidence that Asus do actually know a thing or two about designing devices that can last.
  • Awesome pick as a first Android device. It does feel polished and mature enough to be considered as something a consumer truly deserves, i.e. a device where a sufficient amount of thought and effort seems to have gone into designing the various core functionalities.

 The bad

  • Uses a micro-USB connector #1. I cannot seriously see this connector last. Just like with mini-USB (and boy have I seen mini-USB connectors fail...), there's nothing sturdy about it, and the more you use the connector, the more you feel like it's gonna break like a twig and render your device close to unusable the day you inadvertently yank a cable or an OTG extension, or insert the plug in an odd position... which is apparently what all USB plugs are really designed for.
    Having seen the allegedly more sturdy USB 3.0 micro connector rendered worthless from a cable mishap, as well as having probably performed more than a hundred plugs/unplugs in the few weeks I got the device, I can only dread the day the connector will break. A meagre consolation will be that, when that happens, you're not going to be stranded with a complete paperweight, as you'll be able to use a wireless charger. But then you can kiss goodbye to USB debugging, device reset and any form or development...
    As an aside, were they actually listening to end-users' woes, the USB committee would have devised a sturdy small factor connector, that could be inserted either way, long before Apple did. Then again, that would take letting representatives of the general public have a say in the committee's agenda, which, as we all know, is pure unadulterated heresy!
  • 32 GB max internal flash max is way too small!! 32GB was already too small in 2010 for crying out loud! In 2013, 128GB should come as standard, with 256GB for high end. I can only imagine how ridiculously limited a tablet with "only" 32GB will be in 5 years time... This is all the more incomprehensible as anybody can purchase 64GB micro SD cards off Amazon for less than $50, ergo this is neither a question of technological limitation nor price.
  • No SD slot for you! Google and its minions can lie as much as they want, but everybody knows there's just one reason not to have an SD card slot on a portable device, and that is to force users to get their multimedia content from the restrictive cloud. :(
  • Uses a micro-USB connector #2: The lack of an SD slot above means you pretty much have to use a micro to regular USB OTG adapter, for anything that involves expanding the ridiculous amount of internal flash, which is both awkward and uncomfortable. That is unless you are using a micro SD card with meenova Mini MicroSD Card Reader (which, while a bit pricey, is well designed and well worth the satisfaction of sending a big fat "screw you and your stupid restrictions" message to Google)
  • I've seen a bunch of artefacts (banding in gradients) when displaying pictures, which I haven't seen when the same picture is shown on a regular monitor. That makes me think that the screen is not actually able to display 16M nuances of colours. I have waited 8 years to upgrade from the lousy screen that Sony decided to ship with original PSP (Oh, the remanence!), and this is this only as far we've been able to make the technology evolve? That is a (small) letdown... 
  • Uses USB 2.0 rather than USB 3.0. I don't care if the read and write speed of your flash can't reach USB 3.0 speeds, the RAM can, and one might want to use the device in the future for applications connecting to an USB device where high bandwidth is a must (software oscilloscope, software radio).
  • The default picture and movie viewers from Android are severely lacking functionality. Thankfully, the free QPic and MX Player can be installed, that do a much better job. Still, having a default picture viewer that you can't set to display pictures in alphabetical order is unacceptable.
  • Can't play Hi10 (a.k.a. 10 bits) 1080p mkv's (unless you consider a 2 FPS rate as acceptable). I don't think even a fully optimized video player will ever be able to so on this device, because the GPU and CPU are unlikely to be that powerful. Sure hope the future will prove me wrong though...
  • Video playout of some 8 bits 1080p mkv can be very jerky too, if MX Player decides that the HW+ decoder cannot apply, and, besides Hi10, I have no idea what decides whether HW+ can be used for decoding or not. Thus, depending on how the video file was produced, 1080p playout can be a bit of a hit and miss...
  • Touch screens suck. Having to wipe finger smudges all the time, and wonder where the OS will have decided the tip of your finger went is annoying. Oh and don't even get me started about trying to play arcade games using touch controls. At least for gaming, it shouldn't be that hard to add two 4+1 positions knobs (think microswitch joystick) in a very shallow depressed speaker-like shape, at the rear of the device, to at least allow some acceptable [game|arrow-keys]-like input.
  • As with any tablet, there's no "good way" to get a firm yet relaxed grip when using it.
  • When you try to raise the volume past a completely arbitrary point when using headphones, you get a MOST ANNOYING POPUP about listening at high volume for a long time being potentially damaging, that you have to accept EVERY FRIGGING TIME. The problem is, if you are using a high quality headphone with relatively large speakers, the volume at which this message appears is way too low! I think I'll have to figure out a way to disable this little sucker, because this chronic nagging is really degrading the whole media player experience.
  • No pouch? My old PSP came with a pouch! A portable device whose screen isn't expected to survive a 1.5m drop should come with a pouch for transport and (minimal) protection. What's more, if it has a touch screen, it should also come with a microfibre cloth, that's at least as big as the width of the device. This may sound like a trifle, but it shows that you might actually value your customers.

The Ugly

  • The Android community.
    Trying to find information that is actually of interest for development is such a massive ordeal! You have to go through page upon page of ill-informed posts, as well as scores of people jumping on the Android bandwagon to try to make a quick adversing buck, before reaching anything of actual substance... And don't get me started on Google's "Welp, that 5 line overview of the development process'll do". I'd like to remind Google that, as opposed to most Open Source projects, they do have paid employees that could take care of providing comprehensive documentation...

I guess that will do. This should be different enough from any other review of the Nexus 7 2013 you've seen. And I know some who have made a small jump from a 2012 Nexus 7 to a 2013 Nexus 7, and have been all ecstatic in their review about it, whereas here I am, having jumped leaps and bounds from an outdated portable device, yet with loads to complain about. Still, by my standards, this is a fairly positive review, and I would recommend the device (even over the new more powerful Amazon Kindle for instance), especially as I can't really fault Asus and Google for some items I have a gripe with, such as the USB committee being led by a bunch of monkeys...

2013-09-30

Rooting your Nexus 7 (2013) for the Android virgin...

...but Linux experienced.

Having recently purchased a Nexus 7 32GB (2013 model) as my very first Android mobile device, I am finding that the information on how to gain complete control is both all over the place and supposes you're already familiar with the whole rooting process, which I'm not. Therefore, I'm going to write yet another step by step guide on what you need to do, to be able to remotely ssh into it and run a shell as root, which, IMO, is the one stage where we can pretend that we are actually running a GNU/Linux system under the hood and get things done.

Incidentally, if you don't care about commandline Linux, this process will also grant you full control and let you do whatever you please with the device.

Being a complete Android noob, I will also make sure not to skim over all the "Oh, but you're supposed to know that already!" details, so that you will hopefully be as successful as I was, in rooting your device. On the other hand, I will assume that you are somewhat familiar with Linux. But don't let that worry you as the Linux specific items will come at the very end, at which stage your device will already be fully rooted.

Finally, since it's somewhat convenient, I will be using Windows as the platform we'll use to communicate with the Nexus 7 during this process, and I'll assume that you are familiar enough with it to find your way around the Device Manager, manual driver installation and the Windows command line.

Why *I* want to root my device


I'm not going to venture a guess as to what your reasons are for rooting your device. But one of the first reasons I have, in a very long list, is to be able to edit the device's /etc/hosts and get rid of most of the ads and unwanted trackers, which every other device and computer that I have doesn't have to put up with, through a skilful use of the ever so awesome WinHelp 2002 host file. And yeah, I know there are other ways to block ads, but the /etc/hosts method is still the simplest, most universal and effective way, since it'll block ads for all apps running on your system, rather than the ones in a single browser application.

Now, the ironic part is: the reason I purchased a Nexus 7 in the first place is through revenue that I got from placing ads on a successful little web site (Hurray, for unexpected disposable income!).
Am I really going to bite the hand that feeds me? Watch me!

Besides eliminating ads, there are of course plenty of other reasons to want to root your device, such as recompiling and running your own custom kernel (we'll come to that in a next post), but we might as well start small, by improving our mobile surfing experience.

What the other guides omit to tell you...


For the most part, I am going to follow the video guides at xda-developers and most specifically, the third and second to last from this link. Oh, and if you want a less verbose, yet noob friendly and up to the point guide, I can only recommend the "How to build Cyanogen for Nexus 7 2013" one, as it has a very easy to follow section on rooting. Still, part of these guides suppose some familiarity with the process and omit some important details that you may be interested in knowing beforehand, such as:

The internal name of the Nexus 7 2013 platform is 'flo'

This might be relevant if you are flashing an Android image file that came from a website that isn't dedicated exclusively to the Nexus 7 2013. If you do that, you may want to check that 'flo' is mentioned somewhere in what you're looking at. Alternatively, 'msm', which is the development branch for the 'flo' platform might be a good indicator. Remembering these two can be a good way of avoiding looking at data that is only relevant for the "old" Nexus 7, or other incompatible Android hardware.

You are going to lose all your data!

More specifically, as soon as you unlock the device, which is pretty much the first step invoked in rooting, your device will be completely reset to factory settings.
In the notice they display when you do that (see screenshots below) Google say that this is to prevent someone who got unwarranted access to your phone from accessing your personal data (which is probably only a half truth, but hey...).
My advice then is: if your device is new, you want to root it as soon as possible, so that you don't have to go through the pain of restoring your apps, settings and personal data.

Then again, if you have let some time pass and installed a few things, provided you did set the device to use your google account for backup, a lot of it will be restored automatically as you re-indentify yourself after unlock. Especially, all the apps you have installed, whether free or not, will be re-downloaded and re-installed. Also, if you're lucky, some of the customization and personal data files associated with them may be restored... though you shouldn't really count on that and take your precautions.

But really, the less customized your device is before you root it, the better. Before attempting this procedure then, you probably want to back up as much as you can... though of course, it takes a rooted device to be able to perform a comprehensive backup of your data! As if we needed more reasons to want to root our device early.

As I assume that you are as new to the process as I was, here is a quick overview of the steps we are going to follow:
  1. Enable Developer access on your device - this will allow to connect your Nexus 7, through USB, to the Android debug console as well as the boot/flash utility. We'll need this to unlock the device and flash the custom (non Google) recovery image, that'll help with installing root access
  2. Install the Developer tools on your PC, so that you can communicate with your Nexus in developer mode.
  3. Unlock the stock bootloader, so that it will let you flash a non-stock recovery image. This is also the process that resets your device and data to factory settings.
  4. Install (flash) a custom recovery image - This will allow the installation of the binary that will supervise the granting of root access to applications (SuperSU).
  5. Boot into that recovery image and install (flash) the SuperSU system binaries and deamon.
  6. Reboot the device into standard operation mode, and install the SuperSU app. (SuperSU comes in two parts: A regular "client" app, that can be downloaded from the App Store, and a system executable part that needs to be installed separately into the flash filesystem).
  7. Install Busybox
  8. Install an SSH server
  9. Customize our GNU/Linux system, including /etc/hosts.

Enabling Developer access


So you've backed up whatever you could and accepted the idea that your Nexus will be restored to the clean slate state you found it right after you purchased it. Good.

The first thing we need then is enable developer access, which is disabled by default. To do that, you need to navigate to "Settings" → "About Tablet" (at the very end) and tap the "Build number" section 7 times. Why 7 times? Who knows...

Once you do that, you will get a small prompt indicating "You are now a developer" and after that has occurred, if you go back into the Settings menu, you will see a new "{ } Developers options" category. There, you will find a bunch of additional parameters that you can modify, that may come handy if you do development, but the only one we need right now, under the "DEBUGGING" section, is "USB debugging". So please go ahead and tap that one.

As soon as you do that, you will receive a warning about "USB debugging being intended for development purposes only", which you should accept. This should lead to the following checkmark being displayed:


Installing the USB driver and developers tools


Unfortunately, even as it is WinUSB based, the current version of Android is not WCID enabled (but I'm working on that!), so that means you need to manually install some drivers, to be able to communicate with the device in debug mode.

You should therefore head to http://developer.android.com/sdk/win-usb.html click the "Download Google USB Driver" button, then pretend you accept whatever agreement they want you to agree by not reading it (so that you can feign complete ignorance of the terms if you break them, which I hear is how EULAs work these days) and unzip the files into an usb_driver\ directory somewhere.

Now, you should connect your device to an USB port on your Windows machine. Windows will try, and fail, to locate a driver for the new debugging USB interface, at which stage you should select the "Nexus 7" unrecognised device in Device Manager, select install driver, and point to the usb_driver\ directory you previously extracted.

Once you have done that, you should see something very similar to this:


All that is left, with regards to the developers tool installation, is to go to http://developer.android.com/sdk/index.html and Download the SDK ADT Bundle for Windows (about 450 MB in size). Depending on whether you picked the 32 or 64 bit version, you should end up with a zip file such as adt-bundle-windows-x86_64-20130917.zip which you can then extract somewhere like D:\Android\adt-bundle-windows-x86_64-20130917\.

Unlocking the bootloader


The only thing we are really interested in package above are the adb.exe (Android Debug Bridge - The application that communicates with the Android OS in debug mode) and fastboot.exe (The application that communicates with the bootloader) and that are located in the sdk\platform-tools\ directory. That's right; we downloaded more than 450 MB worth of junk just to access a couple of executables that don't even occupy 1 MB worth of space... talk about bandwidth wastage! (if you are concerned about this, you may want to look for smaller unofficial packages containing only adb and fastboot, or recompiling these from git)

Next, you should open a command prompt into your sdk\platform-tools\ directory and issue:

adb start-server

The command window will display the following:

D:\Android\adt-bundle-windows-x86_64-20130917\sdk\platform-tools>adb start-server
* daemon not running. starting it now on port 5037 *
* daemon started successfully *

D:\Android\adt-bundle-windows-x86_64-20130917\sdk\platform-tools> 

And you will also receive a request similar to this one on your device, which you should accept:


Once you have accepted the request, you will get a short message on the top status bar, indicating "USB debugging connected". Then a persistent USB debug icon, similar to the one displayed on the left, will appear in the top left corner.

The next command we want to enter, in our command prompt, is:

adb reboot bootloader

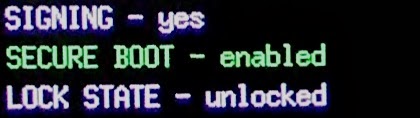
Your Nexus will now reboot in bootloader mode and once that is done, you should see a screen similar to this one, indicating "LOCK STATE - locked":


Note 1: If needed, you can use Volume Up/Volume Down to select the option highlighted at the top, and press  Power to execute that option.

Note 2: You can also enter the bootloader without using the adb command, by powering your table off, and then pressing Volume Down while powering it up.

Of course, we're going to change that LOCK STATE. To do that, and since we are in bootloader mode, we can use the fastboot command:

fastboot oem unlock

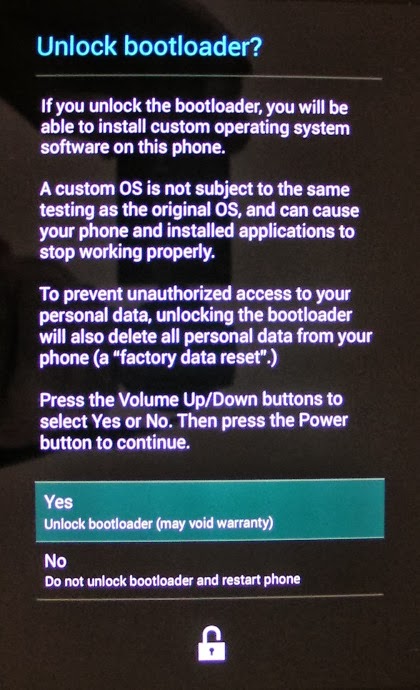
You will get a warning similar to this:


Use Volume Up/Down to select "Yes" and press the Power button. It should return to bootloader menu, but this time you should see "LOCK STATE - unlocked":


Now, you can now reboot your device by issuing the following:

fastboot reboot

Note: Because you unlocked the bootloader, the device will now reset to its factory settings. This is the part where you lose ALL YOUR DATA AND CONFIGURATION.

Installing the TWRP custom recovery image


Make sure your device boots properly, and recreate your account.

You probably also want to take some time to let the backup process reinstall your apps, as well as manually download and reconfigure whatever personal settings and files you did backup, before you unlocked the bootloader. The rest of our operations here should not affect this data.

While your Nexus is being restored, you also want to download the following 2 files:

  • The latest TeamWin Open Recovery image from http://techerrata.com/browse/twrp2/flo, which you should save into your sdk\platform-tools folder\
  • The latest SuperSU zip, from http://download.chainfire.eu/supersu, which you should save, on your Nexus device, in the "Downloads" folder, without extracting it (i.e. as a zip file). This file will be named something like "UPDATE-SuperSU-vX.YZ.zip".
For safety, once you have restored apps, settings and files, you should, issue a complete poweroff. Then boot it back again, confirm that you have USB debugging running (The small Android icon at the top left corner) and, in the command prompt Window issue:

adb reboot bootloader

Now that we're back in the bootloader, we are going to replace the stock recovery image, by flashing the TWRP we just downloaded over it. Provided the TWRP file you downloaded above is named "recovery openrecovery-twrp-2.6.3.0-flo.img", the command you will need to issue:

fastboot flash recovery openrecovery-twrp-2.6.3.0-flo.img

Now you need to reboot in recovery mode. You can do that by using Volume Up/Down until "Recovery Mode" is displayed at the top, and then pressing Power.

You should be greeted with the following screens:


Once you see the above, tap "Install" and select the "UPDATE-SuperSU-vX.YZ.zip" you should have in your "Download" folder:


You should then see the following:


At this stage, you should proceed to swipe, to install the files contained in the zip into the OS partition. What this process actually does is copy two executables su and chattr (Change Attribute) in your /system/xbin/ directory, as well as install a daemon that, will be launched at boottime.

You can then proceed to reboot the device, by selecting "Reboot" on the initial screen and then "System".

Installing BusyBox


Now that we have the system part of SuperSU installed, we can go to the Play Store and install the SuperSU client app, so just go ahead and do that.

Congratulations! At this stage, you have supposedly completed the hardest part, and your device is effectively rooted.

First thing you probably want to do then, is confirm that this is actually the case by installing "Root Checker" from the Play Store. If you launch it and click on the "Verify Root Access" you should get a prompt such as this one:


This is a SuperSU prompt, one that you should become exceedingly familiar with as you install more apps that request root access. When you see it, you should tap on "Grant", and after that, Root Checker should confirm that you have root access indeed.

Alrighty, moving on to our next target. We're of course not going to be sitting around installing rooted apps all day. What we want is an actual Linux shell, that we can access remotely. Thus, the first application we want to install is Busybox, that provides a basic set of base Linux utilities, as well as a basic shell.

On to the Play Store it is. If you search for BusyBox, you'll find a bunch of 'em. The one I installed was the free version from Stephen Ericson (Stericson) that will probably be the first result you'll see.

After it's installed, you should run the app, let it scan your system for a bit, and then go for the Smart Install. In the process, you will be greeted by another "Superuser request" prompt from SuperSU, which you should of course grant.

Once we've done that, and to confirm that BusyBox is properly installed, we're can to go back to our Windows prompt and issue:

adb shell

This opens an interactive shell on our Linux box (with a terminal that sucks, but we're not going to worry about that). You can then confirm that BusyBox was properly installed by issuing the command busybox. The result you get should be similar to this:

shell@flo:/ $ busybox
busybox
BusyBox v1.21.1-Stericson (2013-07-08 15:58:11 BST) multi-call binary.
BusyBox is copyrighted by many authors between 1998-2012.
Licensed under GPLv2. See source distribution for detailed
copyright notices.

Usage: busybox [function [arguments]...]
   or: busybox --list[-full]
   or: busybox --install [-s] [DIR]
   or: function [arguments]...

        BusyBox is a multi-call binary that combines many common Unix
        utilities into a single executable.  Most people will create a
        link to busybox for each function they wish to use and BusyBox
        will act like whatever it was invoked as.

Currently defined functions:
        [, [[, ash, awk, base64, basename, blkid, bunzip2, bzcat, bzip2, cal,
        cat, chat, chattr, chgrp, chmod, chown, chroot, chrt, cksum, clear,
        comm, cp, crond, crontab, cut, date, dd, depmod, devmem, df, diff,
        dirname, dmesg, dnsd, dnsdomainname, dos2unix, du, echo, egrep, env,
        ether-wake, expand, expr, fakeidentd, fdflush, fdformat, fdisk, fgrep,
        find, fold, free, freeramdisk, fsck, fsync, ftpd, ftpget, ftpput,
        fuser, getopt, grep, groups, gunzip, gzip, hd, head, hexdump, hostid,
        hostname, httpd, hwclock, id, ifconfig, ifenslave, inetd, inotifyd,
        insmod, install, ionice, iostat, ip, ipaddr, ipcalc, iplink, iproute,
        iprule, iptunnel, kill, killall, killall5, less, ln, logname, losetup,
        ls, lsattr, lsmod, lsof, lsusb, lzop, lzopcat, md5sum, microcom, mkdir,
        mkdosfs, mke2fs, mkfifo, mkfs.ext2, mkfs.vfat, mknod, mkswap, modinfo,
        modprobe, more, mount, mountpoint, mt, mv, nameif, nanddump, nandwrite,
        nc, netstat, nice, nmeter, nslookup, ntpd, od, patch, pgrep, pidof,
        ping, ping6, pkill, pmap, powertop, printenv, printf, ps, pscan, pwd,
        rdate, rdev, readahead, readlink, realpath, renice, reset, rev, rfkill,
        rm, rmdir, rmmod, route, run-parts, script, scriptreplay, sed, seq,
        setkeycodes, setlogcons, setsid, sha1sum, sha256sum, sha3sum,
        sha512sum, showkey, sleep, smemcap, sort, split, start-stop-daemon,
        stat, strings, stty, sum, swapoff, swapon, sync, sysctl, tac, tail,
        tar, tee, telnet, telnetd, test, tftp, tftpd, time, timeout, top,
        touch, tr, traceroute, traceroute6, tty, ttysize, tunctl, umount,
        uname, uncompress, unexpand, uniq, unix2dos, unlzop, unzip, uptime,
        usleep, uudecode, uuencode, vconfig, vi, watch, wc, wget, which, who,
        whoami, whois, xargs, zcat

shell@flo:/ $

Looks good enough. Now you can type exit to exit the shell and go back to the Windows command prompt.

And since we're done with the Windows command, you may want to issue:

adb kill-server

So that you can later disconnect your device without Windows complaining about it.

Installing an SSH server


At last, we've come to the final piece of our puzzle! Surprisingly, if you visit the Play Store, you'll find that there aren't that many SSH servers on offer.

The one I picked then is "Rooted SSH/SFTP Daemon", which looks a bit basic but does its job very well.

Once you launch it, tap the gear icon in the middle of the screen, and change at least the Login ID (I used 'root') and Password. You probably also want to enable "Wifi Lock" so that the SSH server will keep running in the background as you switch apps.


Now you want to press the large ON/OFF button so that it is highlighted red and so that our server is running. You should also get a small grey round ON/OFF icon in the top left area (see previous or next screenshot). Oh, and you'll probably have gotten another SuperSU grant request at this stage.

"Well, I seem to have an SSH server running alright, you say, but how do I find the name or IP address I should use to connect to it?"

The simplest method, without having to install another app or check your Wifi router, is to swipe down the Wifi icon in the top right corner and tap the Wifi properties.
Oh yeah, did you know that, if you swipe down any of the small status icons that appear at the top, you can quickly access the application and settings behind them? That's a good trick to know, and I sure didn't.

In this case, you'll be able to tap your current Wifi connection and get the IP address you need to use for SSH:


Give a go to that IP address in an ssh client, such as putty, and lo and behold, you should be connected to your Nexus 2013 Android device under a nice shiny shell. That's more like it!

Customizing our GNU/Linux Android system


Let's now push things to their logical conclusion, by performing 2 last items:
  1. As you may have noticed if you scan your network, and if you let the DHCP client provide its desired hostname, your Nexus 7 will be identified as 'android_12345678' or something. Ugh, let's change that!
  2. Edit that /etc/hosts to filter ads, as we said we'd do.
With regards to item 1, a quick search tells us that the file we want to edit is /system/build.prop, where you want to add a net.hostname=my_name line. So you go ahead and try that, only to find that the file is read-only?!?
What gives? Weren't we supposed to be root here?

Well, that's Android security for ya (which may or may not be that bad a thing). By default, only the directories under /sdcard (such as "Download" and stuff) are read/write. The rest of the system is read-only.

Fixing this is easy though. If you want to modify system files then, you just need to issue the following to be granted full read/write access:

mount -o rw,remount -t rootfs /system

Much better!

Now you can edit your /system/build.prop to your hearts content and change the DHCP hostname.

Let's finish the job by going ads busting then. Still from the ssh shell:

cd /sdcard/Download
wget http://winhelp2002.mvps.org/hosts.zip
unzip hosts.zip
mv HOSTS hosts
dos2unix hosts
cp hosts /etc/

The last line will overwrite the existing /etc/hosts, which is fine since it only contains one entry to alias 127.0.0.1 to localhost (which is also present in the new file). Oh, and the dos2unix is necessary as the original HOSTS file was saved in DOS mode.

Do that, try to surf, and watch in awe as the ads pollution has now gone away...

I think my work here is done...

2013-08-28

Does a clean install of Windows 8 recover existing Storage Space(s)?

Yes it does. of course, it would make the whole thing pretty useless if it didn't... Moving your Storage Space drives to a different Windows 8 machine should work too, though I haven't tested this specific scenario.

My advice however is to (re)install Windows 8 with all your storage space drives unplugged, then make sure the newly installed Windows 8 can access a non Storage Space HDD over all the mass storage controllers you will be using for your Storage Space array, and only then replug your Storage Space disks.


2012-07-06

Using rss2email and github feeds to only notify of issues

Long story short:
  • We want any github issue notification related to the libusbx github project being pushed as an e-mail to libusbx-devel mailing list.
  • The default notification mechanism of github is next to useless to do anything like that, especially if you're working with a project that is associated with a github organization.
  • As a result, we have created a libusbx-devel user that, monitors the libusbx project as a pull-only participant, and that receives NewsFeed about issues among other things. This NewsFeed can then be used as RSS/Atom (https://github.com/libusbx-devel.private.atom), and fed through rss2email to send e-mail notifications to the mailing list.
  • However, besides report about issues, the NewsFeed also contains reports about wiki updates and whatnot, i.e. loads of polluting events that we don't want the mailing list to get notified about. And neither github or rss2email offer the possibility to filter events on their own.
  • A quick look at the feed with curl indicates that RSS/Atom entries are tagged, with something like: <id>tag:github.com,2008:IssuesEvent/1570141350</id> or <id>tag:github.com,2008:IssueCommentEvent/1570141345</id> for the ones that are of interest to us, and <id>tag:github.com,2008:GollumEvent/1570245314</id> for the ones that aren't
  • Thus, if you use a dedicated copy of rss2email for the github feed, it is possible to modify the rss2email.py code, and add a filter that ensures only entries that have an issue related tag are processed, with:
    for entry in r.entries:
            id = getID(entry)
            if id[:25] != "tag:github.com,2008:Issue": continue
            
            # If TRUST_GUID isn't set, we get back hashes of the content.
    so that anything that isn't issue related is filtered out.
Of course, the proper way would be to add an INCLUDE_TAGS/EXCLUDE_TAGS section in rss2email's config.py, that can take wildcards, and then cross reference these in the code above, but since we don't have a all day...

Bonus 1: If you need authentication with rss2email, assuming that libusbx-devel is your user, the following is an example of the URI you should use for the RSS: https://libusbx-devel:PASSWORD@github.com/libusbx-devel.private.atom
Bonus 2: In case you want to play with the github JSON API, that pertains to issues, rather than the RSS, and provide libusbx/libusbx is your project, you can issue something like

curl -i -u libusbx-devel:PASSWORD https://api.github.com/repos/libusbx/libusbx/issues/events